Mobile Load Testing on the Cloud
Originally posted here.
What is mobile load testing?
What is the difference between load testing web apps and mobile apps? In general, your goal is the same: to improve app performance by systematically exposing your app to the load you expect, whether it’s on the web or on a mobile device. However, while the purpose may be the same, there a few extra things to consider when it comes to mobile app performance, and it’s easy to make some key mistakes. In this article, I’ll give you a little bit of the theory behind mobile load testing and then show you practical steps to script and execute a load test.
Challenges in mobile load testing
If you have a web app that is mobile first, and your users typically access your site through a browser on their mobile devices as well as on their laptops, you have more choices for optimizing mobile performance. You can use browser-based load testing tools as well as protocol-level load testing tools to generate load.
If you have a native mobile app that you’d like to load test, though, browser-based load testing tools are a little more complicated. One of the most common approaches to mobile load testing is to use some type of device farm. A device farm is a collection of mobile devices and a way to orchestrate and control them so that they access an application simultaneously. Here’s why they’re not the best choice for load testing.

Device fragmentation
One of the biggest challenges is mobile device fragmentation. Not only are there a lot of mobile devices, but there are also many operating systems and versions. Even narrowing the pool to Android and ios leaves us with a large selection. A common mistake in mobile load testing is trying to account for these hundreds of combinations.
Logistics
Another challenge is the logistics of controlling physical devices with different operating systems, which is not trivial. Unless you have a thousand friends that you can rope into doing this at the same time, you’ll need to pay for some sort of service that can orchestrate this for you.
Cost
There’s also the fact that this process is resource-intensive. Even if your device farm consists of emulators on virtual machines rather than physical mobile devices, that still uses up a lot of CPU and memory, and you’d need to spin up dozens or hundreds of machines.
Luckily, this type of mobile load testing is not the only option available to us.
Better strategies for mobile load testing
A better option for back-end performance testing or load testing your mobile application is by using API load testing, which works on the protocol level. To understand this, let’s talk about what aspects of software we are analyzing when we test for “performance.”
We can generally break up performance testing into two types: front-end and back-end. Both types have the goal of making the app respond faster to end-users, but they do so by optimizing different parts of the application.
Front-end performance
Front-end performance is primarily concerned with the UI of the app. A front-end performance tester optimizes page resources (like CSS, images, JS) to render faster on the page. Since a mobile app runs on a user’s smartphone or another mobile device, its front-end performance would also be affected by things we can’t control, such as the operating system and version of the mobile or its physical configuration (CPU and memory). A front-end issue for a particular mobile device type might not necessarily affect performance on another. Device farms can be good at measuring front-end performance.
Back-end performance
In contrast, back-end performance focuses on the underlying mobile application servers. A back-end performance tester optimizes the things behind the interface, and it is affected by things like the size of the responses that a server sends to a user, server configuration, application infrastructure, and how downstream servers talk to each other. These factors may be invisible to a typical end-user. A performance bottleneck in the back-end is likely to affect all users of an app to some degree.
Load testing for back-end performance
Load testing is about determining how your mobile application behaves in response to traffic, so it targets the back-end components of the application, not the front-end.
Both front-end and back-end performance are necessary to get a holistic view of mobile performance. Still, if you want to load test your mobile app, you need to generate traffic on your application server, and not necessarily to drive the app on real devices. Understanding this opens up options for mobile load testing.

API load testing
Most native mobile apps work by using a RESTful API to send instructions to the application server. Luckily for us, there’s no magic in sending these types of requests from a smartphone— we can simulate this easily by using an API load testing tool to send these requests on a non-mobile device too.
Here are some advantages of using API load testing tools to test your mobile app instead of using a device farm:
- It’s easier to set up and maintain: API load testing can be easier because you don’t have to account for changes in the user interface as long as the underlying API calls are the same.
- It’s cost-effective: You can run about 1,000 users for an API test on a single machine (we used AWS m5.xlarge machines to arrive at this estimate). This translates into fewer resources that you’ll need to pay for whether you’re running a thousand users or [a million](whether you’re running a thousand users or a million), and, ultimately, a lower cost.
- It lets you narrow your load testing scope: If you have a particular endpoint that has historically shown performance issues, you can use API load testing to target just that one endpoint. On a device farm, you would have to create a test automation script that might click a button and send dozens of requests, only one of which you actually wanted to test.
Tools for mobile load testing
You can use many tools for API load testing, but you can’t go wrong with robust open-source tools like JMeter and Gatling. Both tools are well-used tools in the performance industry, and they also have large user bases and ample documentation for helping anyone get started. In this article, I’ll continue with JMeter specifically.
How do you get started with writing your script? Ideally, your developers should be able to point you to the API documentation for your app or be able to describe the format of the request themselves. But what if you wanted to get started on your own?
How to record network traffic from a native app with Apache JMeter
Recently I wrote an article on The New Stack about how I would have load tested the IowaReporterApp, which was responsible for delays in reported vote totals for the 2020 Iowa Democratic Caucuses. To show how to load test that app, I created an actual load testing script for that article, without any input from the app developers. I chose to script using Apache JMeter, a popular open source API load testing tool, but Gatling (also open source) is another good option.
Here are the steps I took on my Android mobile, a Samsung Galaxy Note 10+. The same principles should apply to iOS devices and other Android devices.
1. Download and install the app.
Even if the app isn’t on the Google Play store, you can install an app using the .apk file. You may have to enable Developer Mode on your phone, which is not the same as jailbreaking. All this does is bypass the security feature that would otherwise not allow you to install apps that don’t come from the Play store.
To enable Developer Mode, go to Settings > About phone > Software information. Then, scroll down to the field Build number and tap it seven times. You should see a confirmation message that Developer mode is on.
Now download the .apk, click on it, and follow the prompts to install it.
2. Set up an HTTP(S) Test Script Recorder on JMeter
You’ll need to have JMeter set up already for this step.
Connect your laptop to a wi-fi network.
From a new test plan on JMeter, right-click on Test Plan and then click on Add > Non-Test Elements > HTTP(S) Test Script Recorder. Click on it and take note of the port it uses in Global Settings.
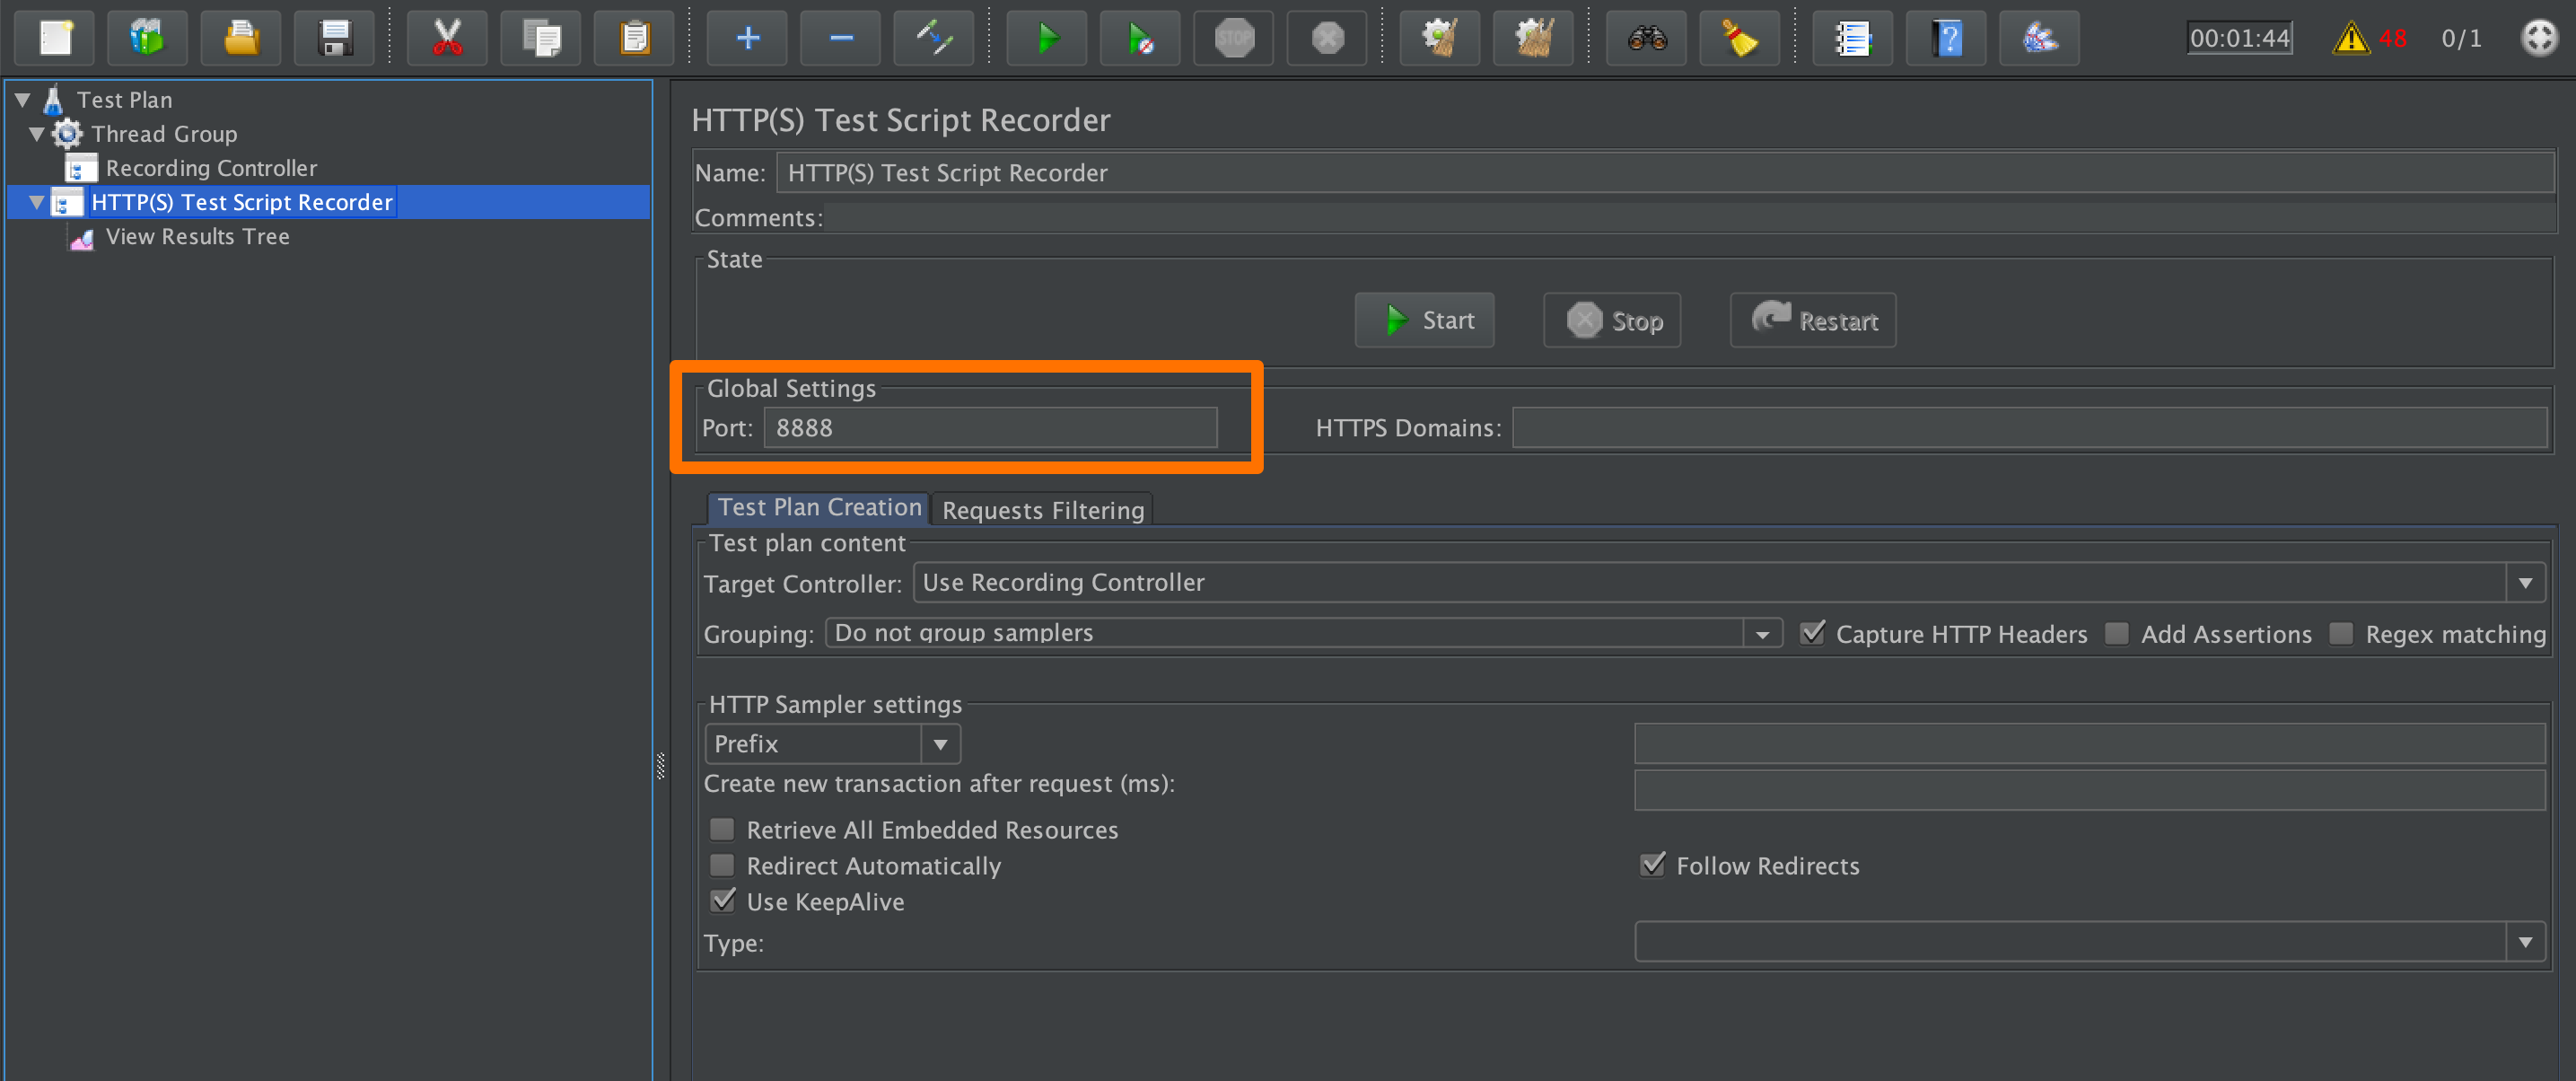
Next, right-click on the test recorder element you just created and click Add > Listener > View Results Tree. This element shows details of requests and responses when we run tests.
Then, right-click on Test Plan again and click Add > Threads > Thread Group.
Finally, right-click on Thread Group and click Add > Logic Controller > Recording Controller.
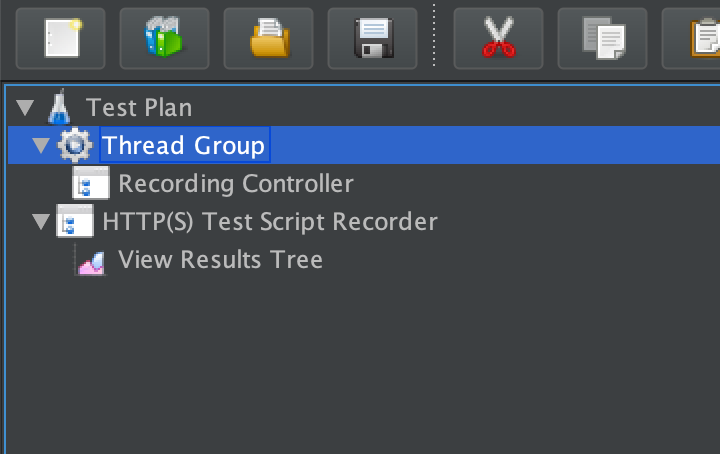
Your test plan should look something like this:
3. Set up your mobile to use a proxy.
On your mobile, connect to the same wireless network that your laptop is connected to.
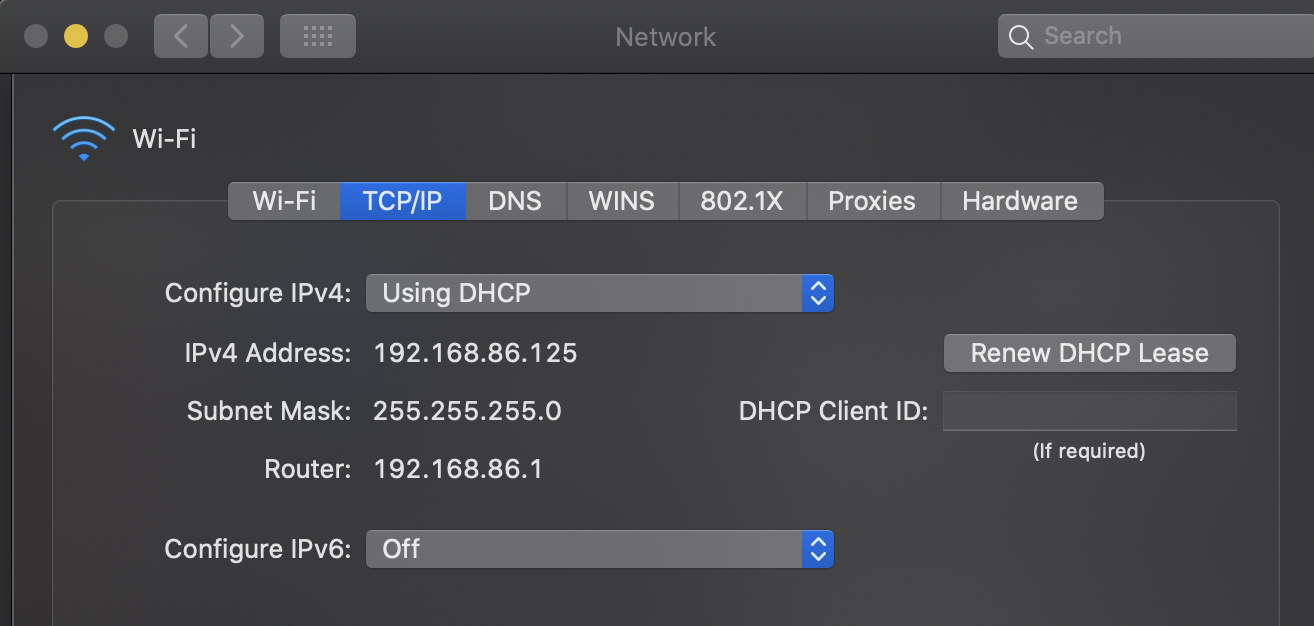
Go back to your laptop and find out its local IP address. On a Mac, you can see this by clicking on the Apple logo > System Preferences > Network > Advanced > TCP/IP. The IPv4 Address is what you’re looking for, and it might look something like 192.168.86.125.
On your mobile, go to Settings > Connections > Wi-Fi. Under Current network, click on the settings wheel next to your wireless network. Click on Advanced.
Enter your computer’s local IP address in the Proxy host name field.
In the Proxy port field, enter 8888, or the port that was displayed in the HTTP(S) Test Script Recorder on JMeter.
Click Save.
4. Start recording traffic.
On JMeter, click on the HTTP(s) Test Script Recorder element and click Start.
On your mobile, open the app and log in or perform the action that you’d like to record.
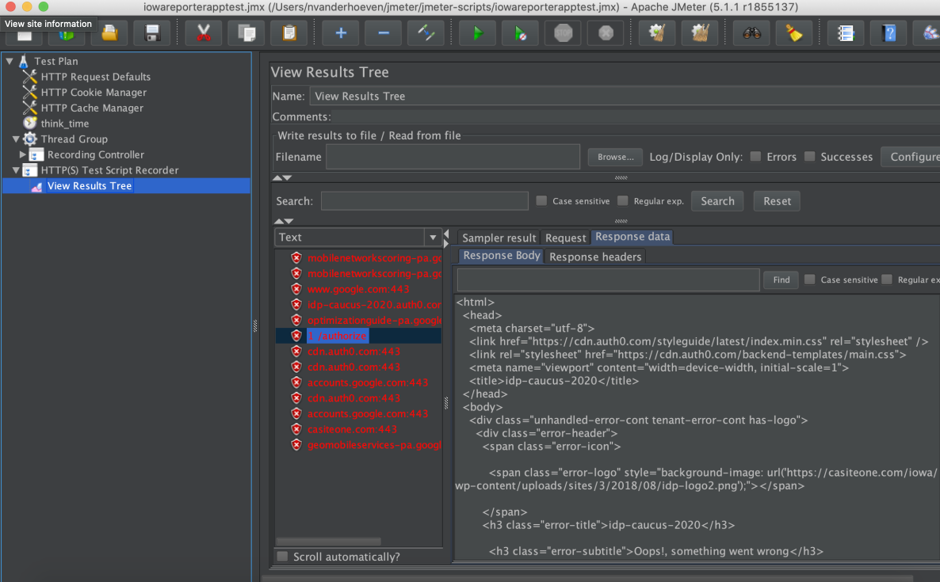
As you use the app, you should be able to see the requests coming in on JMeter in the View Results Tree:
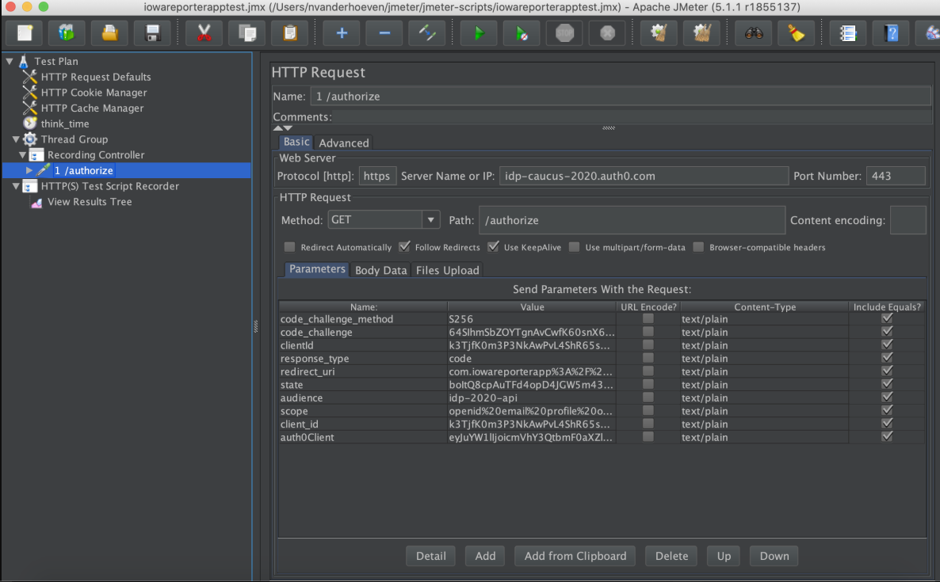
If you click on the Recording Controller, you’ll also see the exact format of the requests that the app made:
Scripting and troubleshooting your mobile load testing script
What you now have is a recording of the mobile traffic you need to simulate. If you stop here and try to run it, you may find that it fails. That’s because you haven’t done any scripting yet.
Here are a few things you’ll need to do to turn a recording into a script.
Add assertions
An assertion is a way to verify that the request is returning the response that you expect. JMeter only marks a request as failed when it returns an HTTP 4xx or HTTP 5xx response code. However, there are times when the HTTP response code returned is an HTTP 200 OK, but the page that was returned was still not the one you expected. Without assertions, JMeter would mark this request as passed, yielding false positives.
For instance, if you’re sending a login request, then a good assertion for the response to that request might be text like “Welcome, Nicole” or “Logged in.” To see the data that should be returned, you can either run through the action manually in your browser and use Developer Tools to inspect the response or click on the response tab in the View Results Tree listener in JMeter from your recording.
Assertions also allow you to pinpoint more accurately where in your script the error is.
Replace hardcoded values with dynamic values
The last screenshot above shows the parameters that the mobile application sends to the server to log in. If you examine the parameter values, you’ll notice that several of them are long strings. The script fails when you just send the same request again because some of these are dynamic. This means that parts of the request need to change before your device is allowed to access the application. You might need to add a timestamp, the right answer to a challenge, a session or client ID, or codes returned in previous requests. These dynamic values help the server determine whether the login request is a valid login attempt.
This is where help from a developer would come in handy because he or she can tell you how each parameter value needs to be formed.
Add think time
Think time is a delay between requests that simulates the pauses that a real user takes to read text on the page or otherwise interact with your application. Most performance testing tools do this. In JMeter, they are called timers, and there are several to choose from.
I like the Uniform Random Timer because it allows you to set a constant value for the delay as well as an additional random delay on top of it. I recommend having a variable delay because setting a completely constant delay makes the test too regular and causes unnaturally high load at the interval you set. Real users don’t coordinate with each other, so stagger your requests by using a variable component to your think time.
Debug your test script
Before you think about scaling up, run your test a few times with one user on your local machine. If you don’t get any errors, try other configurations such as running two sequential users and running two threads at the same time. This way, you can test any correlations you’ve had to make for those dynamic values.
It may be tempting to skip this step, but it’s necessary before scaling up your load test.
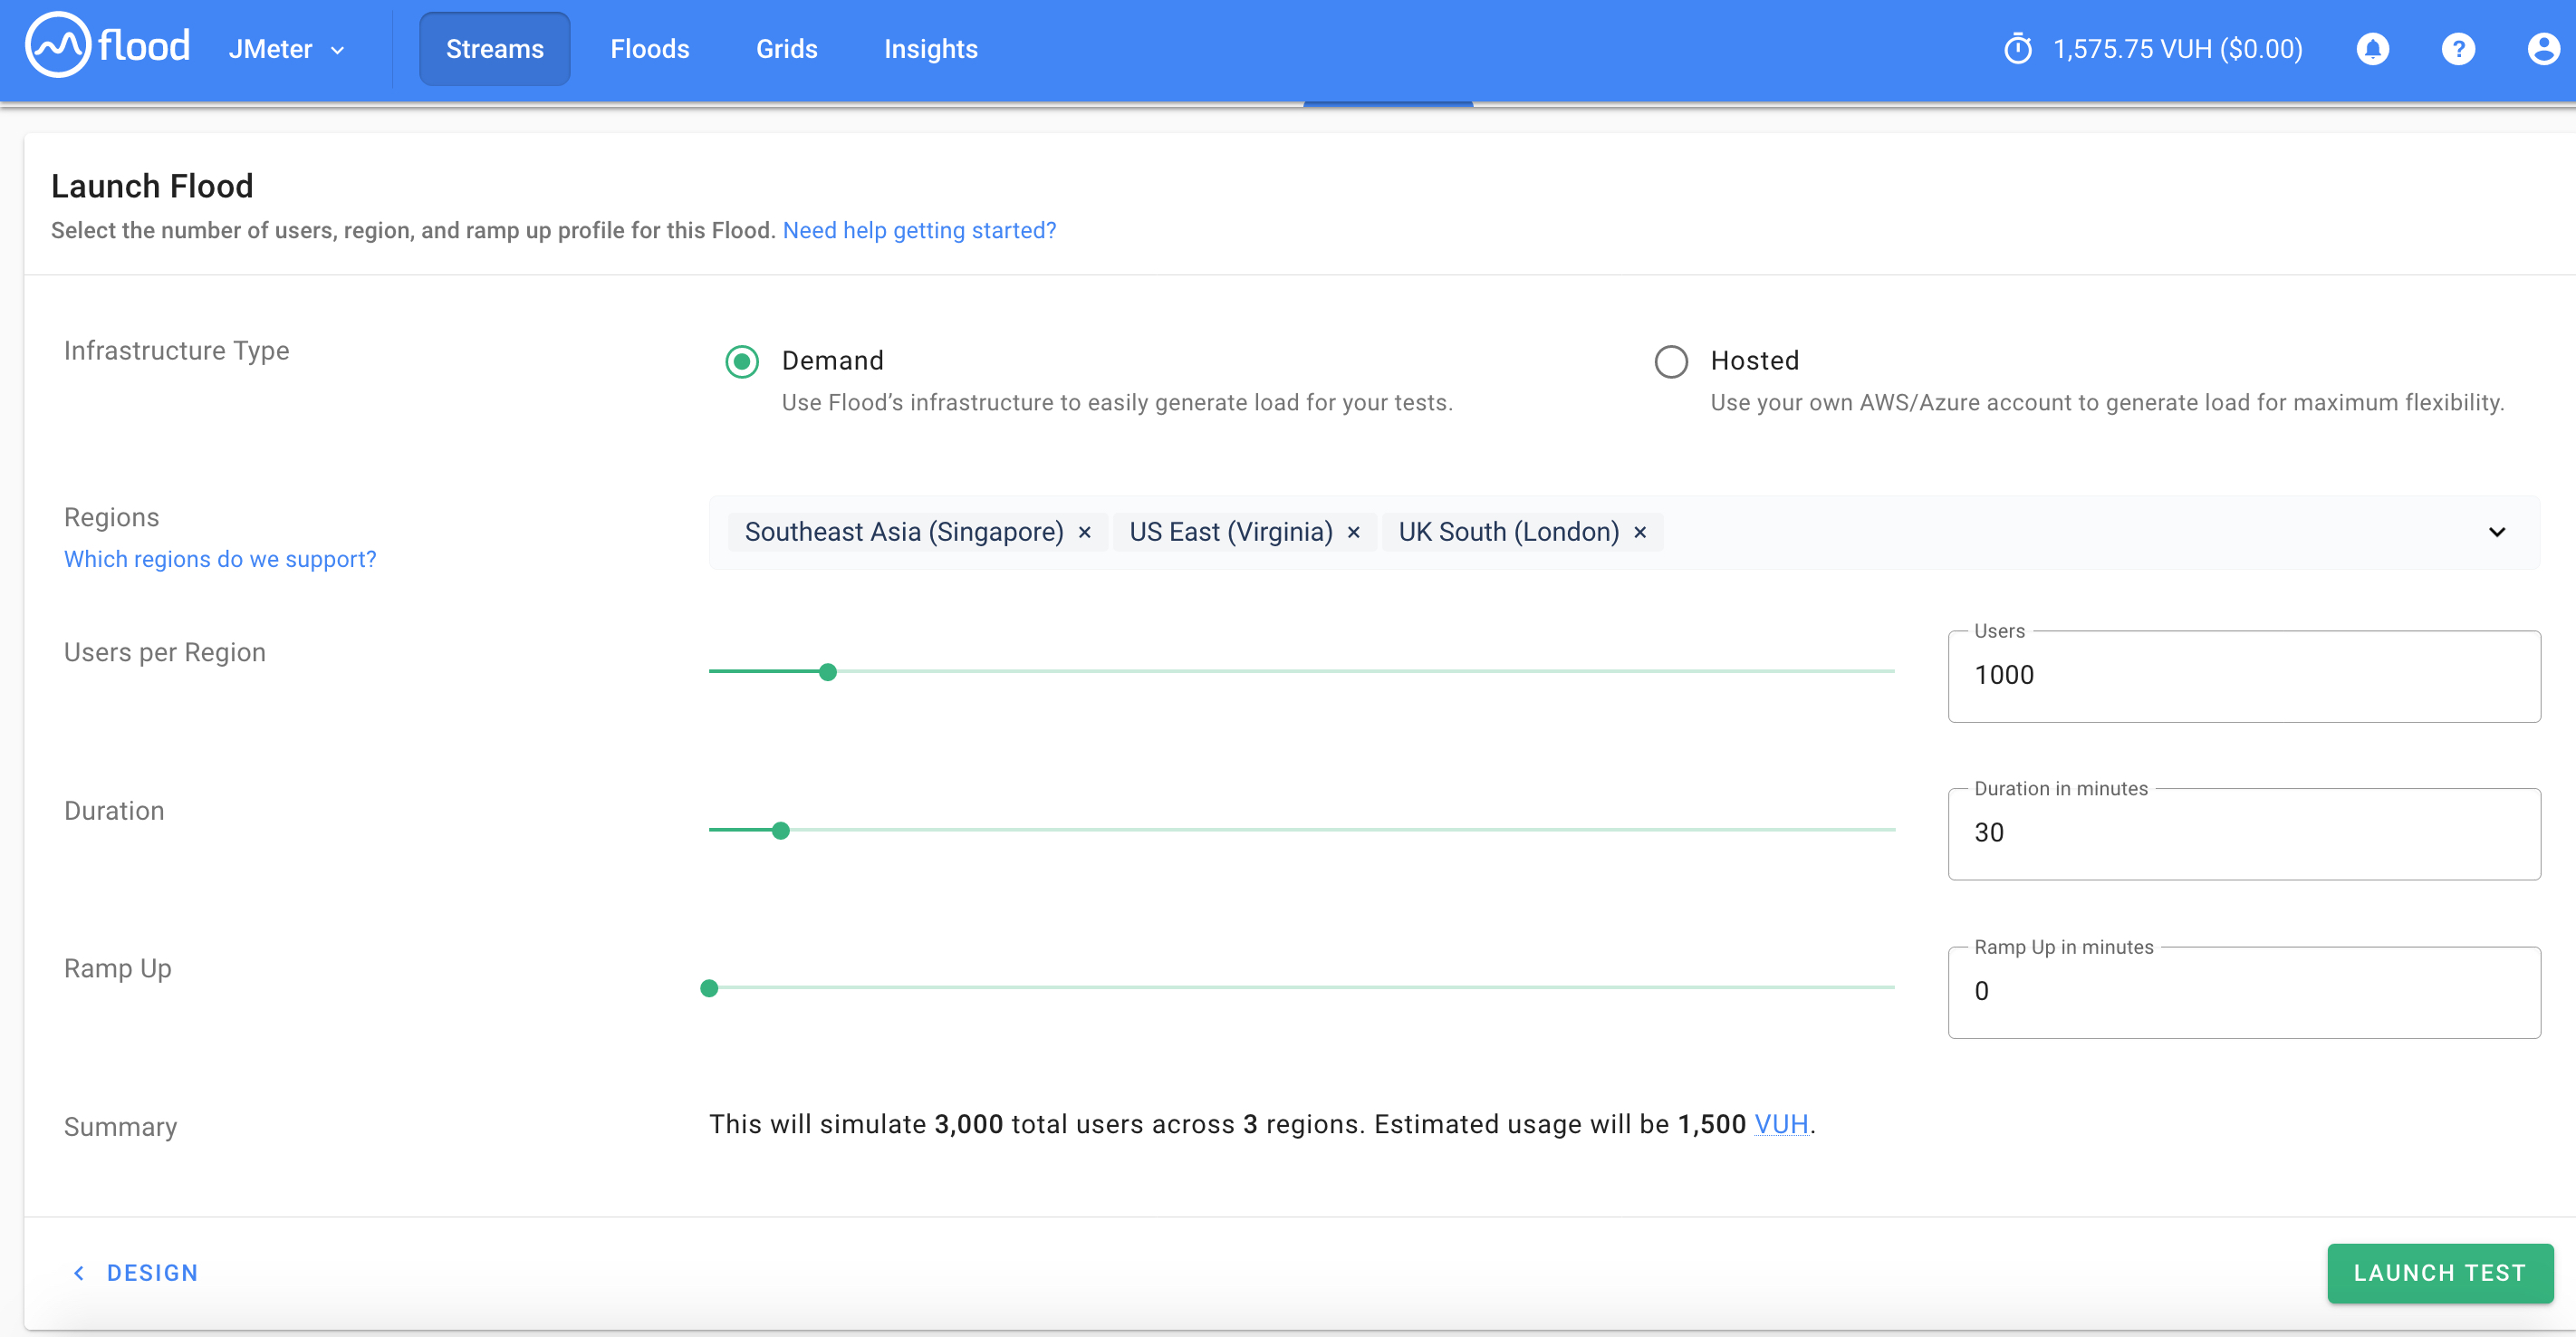
Set test parameters
Test parameters are settings like the number of threads, ramp-up, and duration, which allow you to shape the pattern of the load you want to generate according to your test scenarios and test cases.
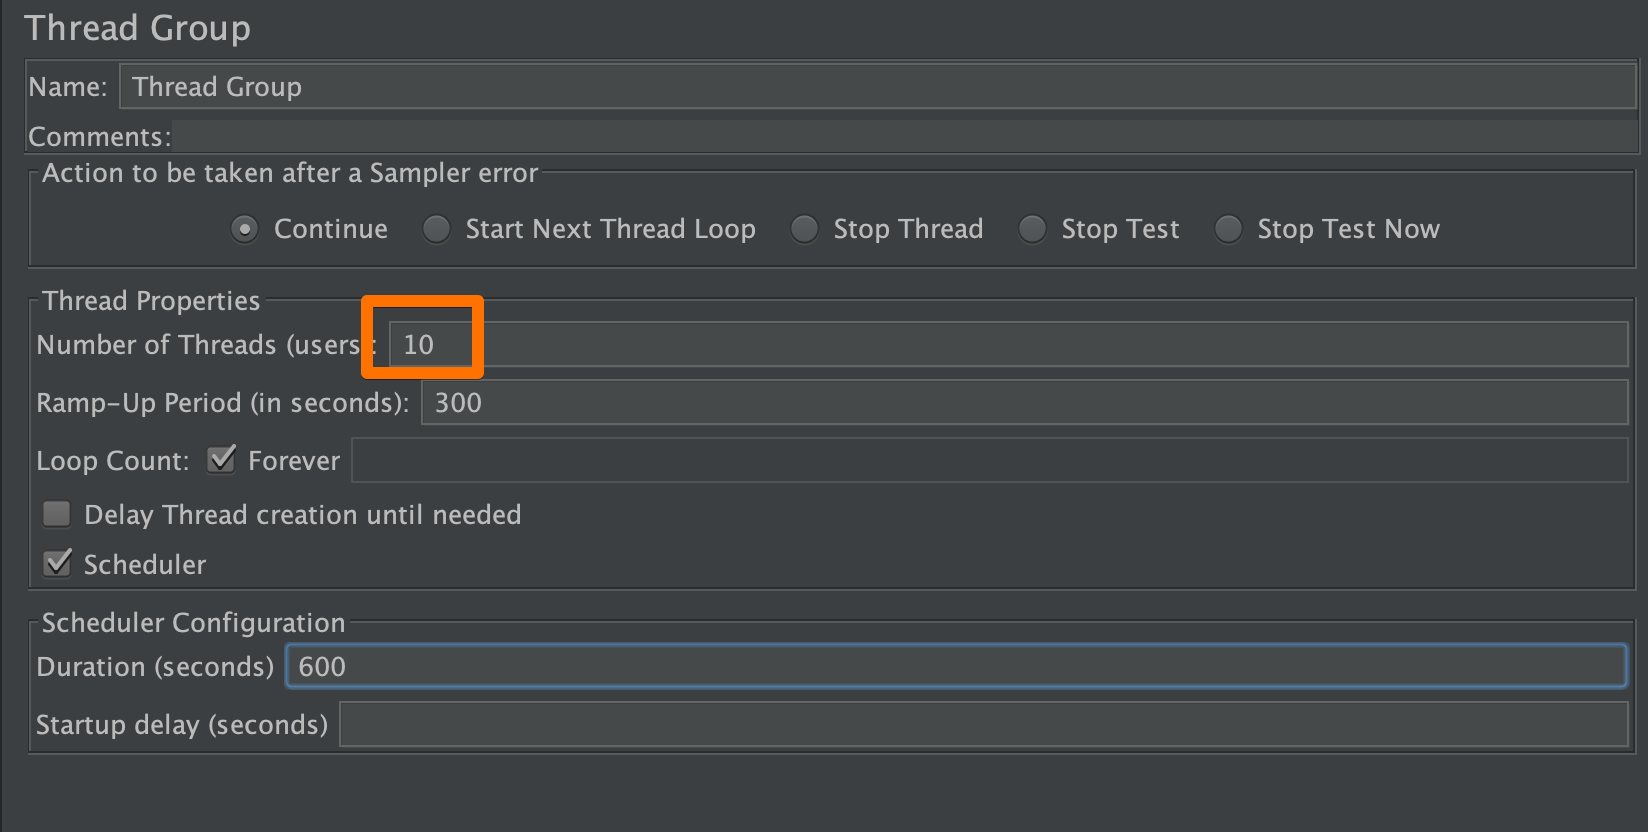
Number of concurrent users or threads
This is the most obvious way to increase load. The more instances of your script running, the more requests are executed.
You can change this in JMeter by clicking on your Thread Group and changing the “Number of Threads (users)” field:
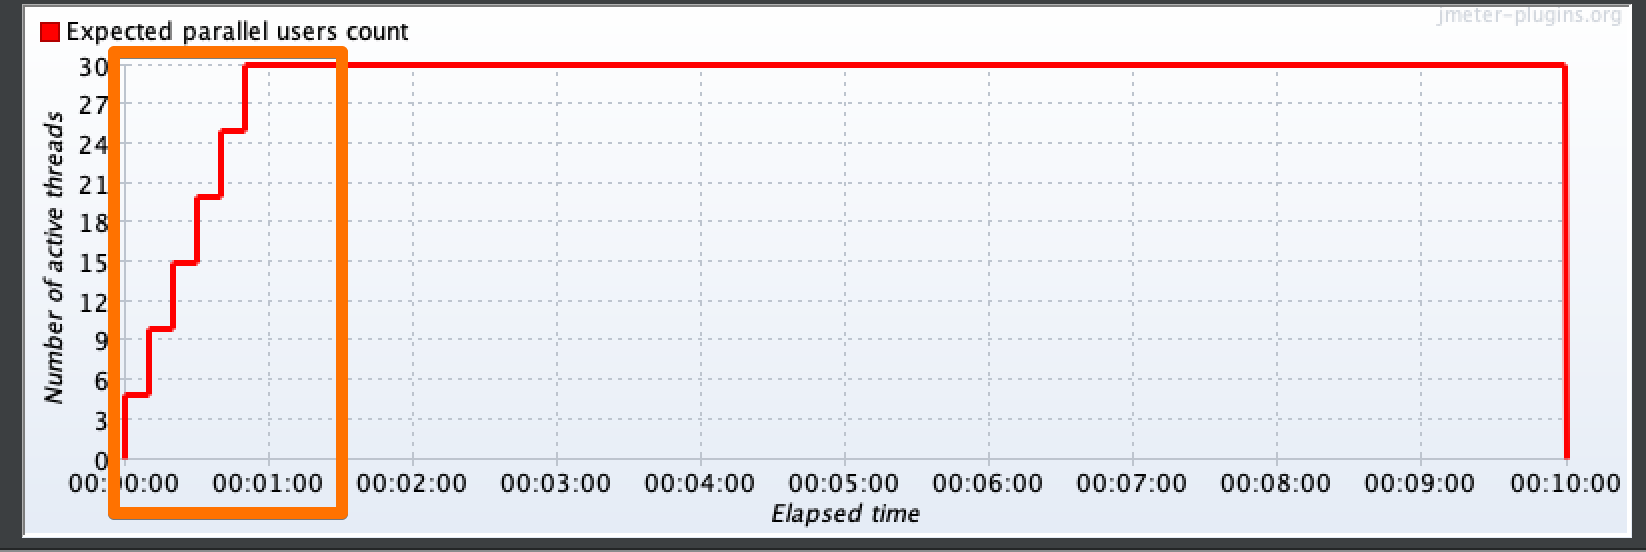
Ramp-up
In production, load on servers very rarely goes from 0 to 1000 in one second. Even for cases with a very definitive start time (such as an item going on sale at a particular time), the load generally increases gradually. You can simulate this gradual increase by adding ramp-up times in your script. A ramp-up is the amount of time during which new users are added at staggered intervals.
Here’s an example of what that might look like:
Duration
Duration is how long the whole test lasts.
The simplest way to set these values in JMeter is to use the basic Thread Group. You’ll need to change the fields highlighted below:
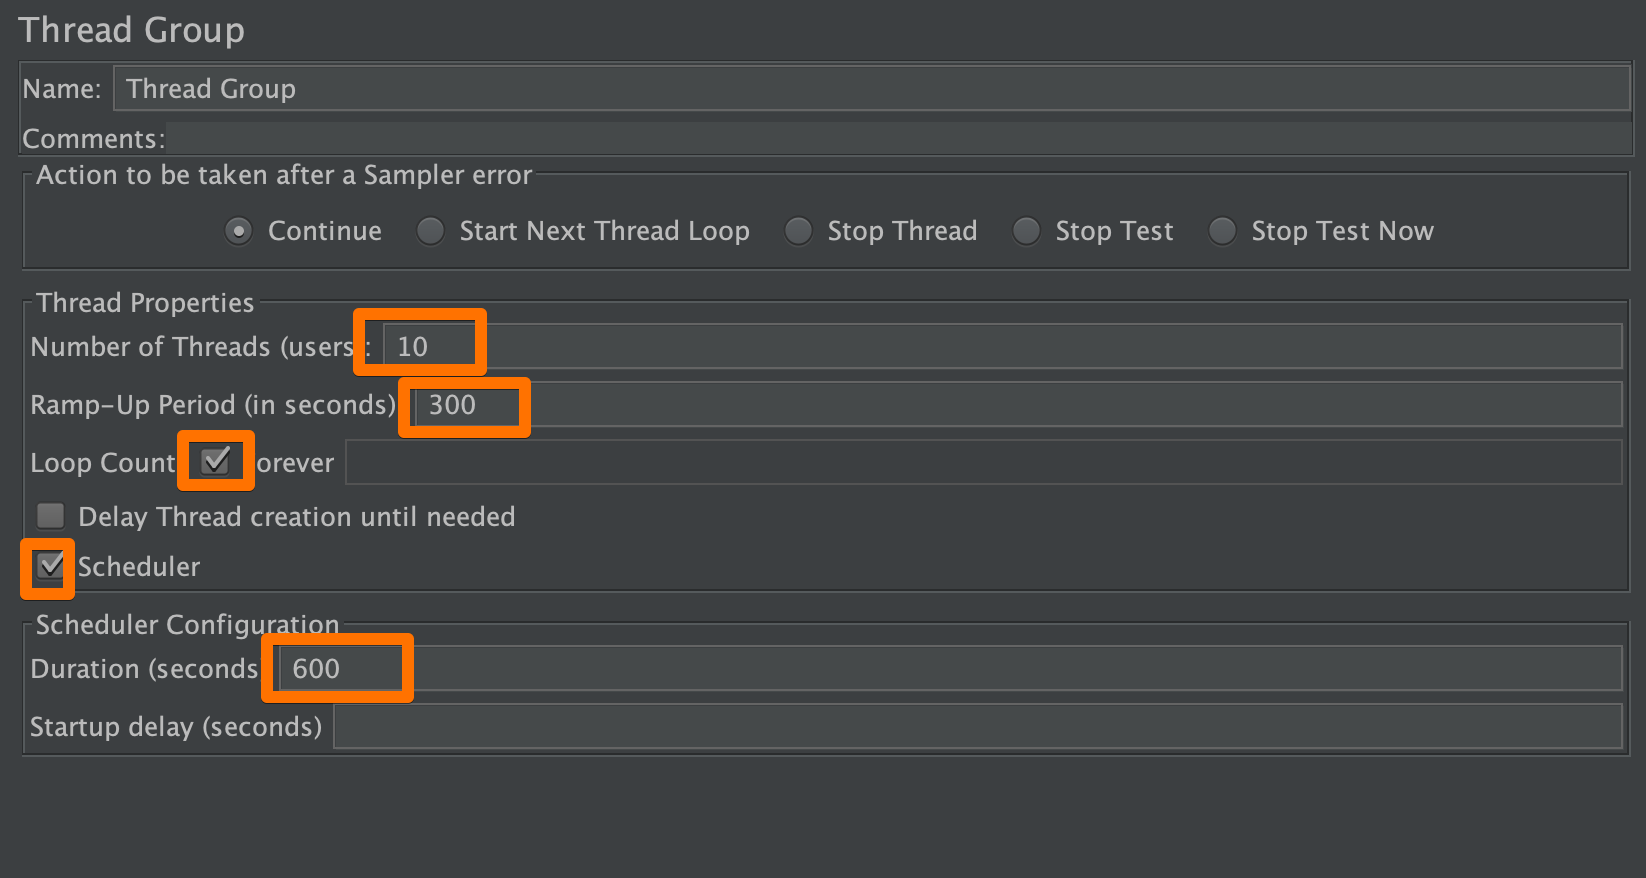
To use the duration, you’ll have to select “Forever” next to Loop Count and “Scheduler” and type in the number of seconds in the Duration field. Otherwise, you can also run the script according to the number of loops, or iterations, that you want to run. However, since response times vary, using the Loop Count as a proxy for duration yields different results from test to test.
Running a shakeout test against your mobile application
When you’re ready to run on your load generators, resist the urge to jump straight to the peak load you want. This is a great way to incur unnecessary costs. Instead, run a small test with dozens of users. Running locally is for debugging issues in the script. The purpose of running a shakeout test is to spot errors elsewhere, such as in your test environment and your test data.
Baselining your mobile application performance
Finding a baseline is one of the primary goals you’ll have as you start executing load tests. To be able to assess how changes in the environment or code affect application performance, you’ll need a stable point of comparison. To accurately measure the effect of a variable (like a code change), it’s best to keep as much of the other circumstances surrounding the test as fixed as possible. The baseline is your unchanging test scenario that you can use as a point of comparison to assess future performance.
The application you’re scripting against, your tool of choice, and your script all affect your performance baseline, so do some experimenting to find out the setup that works best for your situation. This setup includes characteristics like:
- the number of concurrent users
- test duration
- think time, pacing, and all other waits and delays
- the script (including how requests are broken up into transactions)
- user density
User Density
User density is the number of threads that you can run on a node or a load generator. Figuring out user density it essential because all load generators, even virtual ones, have finite resources. Each load generator also has a finite amount of load that it can generate, based on its CPU and memory utilization, among other things. Trying to generate too many users on a single node may result in the node itself being the bottleneck for your test.
To accurately assess your application’s performance, your load generators need to remain healthy during the test.
It can be helpful to have a number to start with. At Flood, we’ve found that we can reliably run 1000 users using JMeter or Gatling with one of our AWS m5.xlarge machines. For reference, an m5.xlarge machine has 4 VCPUs and 16 GB RAM.
If your machine is similarly specced, run a test on a single node with 1000 users. While the test runs, watch the CPU and memory utilization. If the test finishes without either of those consistently hitting over 80%, you’ll know that the node can handle that number of users.
Let me reiterate, though, that you should use the 1000 users figure as a starting point only. You can then figure out your number through trial and error. Increase the number of users past 1000 and watch the resource utilization again. If that still looks good, add some more users and rerun. When you get to a test where the resource utilization hovers above 80%, stop and fall back to the previous number of users. You’ll now have your number.
Another thing you might want to play with is the think time and pacing in your script. These waits tend to have a significant impact on resource utilization, so you can expect to be able to run more users per node if you increase your delays.
If you’re using JMeter, always run your tests in non-GUI mode. GUI mode is great for debugging, but is unnecessarily resource-intensive for real load tests. While you’re at it, disable any listeners you may have that you don’t need to capture results.
Figuring out the appropriate user density now prevents you from getting inaccurate test results. Running as many users as you can without overloading the load generators is also cost-effective, as you’ll be making sure that you provision only as many nodes as you need.
Scaling up your load test on the cloud
It’s relatively simple to run a load test on one machine, but if you want to run on two or more machines, things quickly get unwieldy. Here are some options for achieving this.
1. Upload your tool of choice and script to every machine and kick off each test separately.
Instead of running one large load test, think of this method as running several smaller ones at (about) the same time. This is relatively easy to set up, but the main disadvantage is that it’s tedious. You may also need licenses for your tools if you’re not using an open source one. You’ll want to ensure that each load generator is as similar as possible to the others in terms of operating system, tool version, and script version. Since each node kicks off a separate test, you’re not going to be able to see a real-time combined view of all the load tests, and after execution, you’ll need to retrieve results files individually and combine them.
2. Use your tool’s distributed testing mode.
JMeter has a feature that allows you to scale. This involves setting up agents on each load generator and using scripts to coordinate execution and results collection. This method requires a little bit more know-how and time to set up, but it’s a little more cohesive than the first method. Here are links on how to set this up: Remote Testing with JMeter
3. Use a load testing platform.
I’m admittedly biased, but if I were to go back to doing performance testing consulting work, I would choose Flood to run my tests. A platform like Flood that is built for distributed load testing is an excellent choice because it takes away all the setup considerations. This is the easiest option, especially for teams that are new to load testing or are perhaps less technical, because all the setup is done through a UI. Scaling out in this case just means uploading your script, choosing the number of nodes you want to run and in which region, and all the work is done for you in the background.
While you can run on-premises, I would consider running your test cloud-based infrastructure for greater flexibility and ease of scaling unless you already have a data center.
What happens next?
Running your test is just the beginning of mobile performance testing— there’s still metrics collection, results analysis, and resolving performance bottlenecks that you uncover. After all, it’s what you do with the test results that counts. Remember that performance and load testing, whether for web-based applications or mobile ones, are iterative. The real value comes from building the app performance testing principles discussed here into your release cycles, so that load testing becomes a habit rather than just a one-off exercise.